Introduction
The PAC application enables users to write and upload their own custom attack scripts to the platform. This level of customization allows for the development and deployment of unique business logic attacks across an entire suite of enterprise applications with ease. These attacks should be compliant with one of the scanners PAC supports.
Common Vulnerabilities and Exposures (CVE)
Custom attacks are categorised under the CVE section of the PAC configuratin file.
This documentation provides the complete steps about how to use the custom scripts in PAC.
Prancer PAC also supports running of custom Bash shell scripts as part of custom codified attacks.
Setup the Git Repository
Custom attacks in the Prancer platform will need to be linked to a Git repository in a particular location. There are two files that are needed in your Git repository; the codified attack script and the metadata YAML configuration file. To better show this, we will go over an example script below.
Codified Attack File
http_sender_attack.js
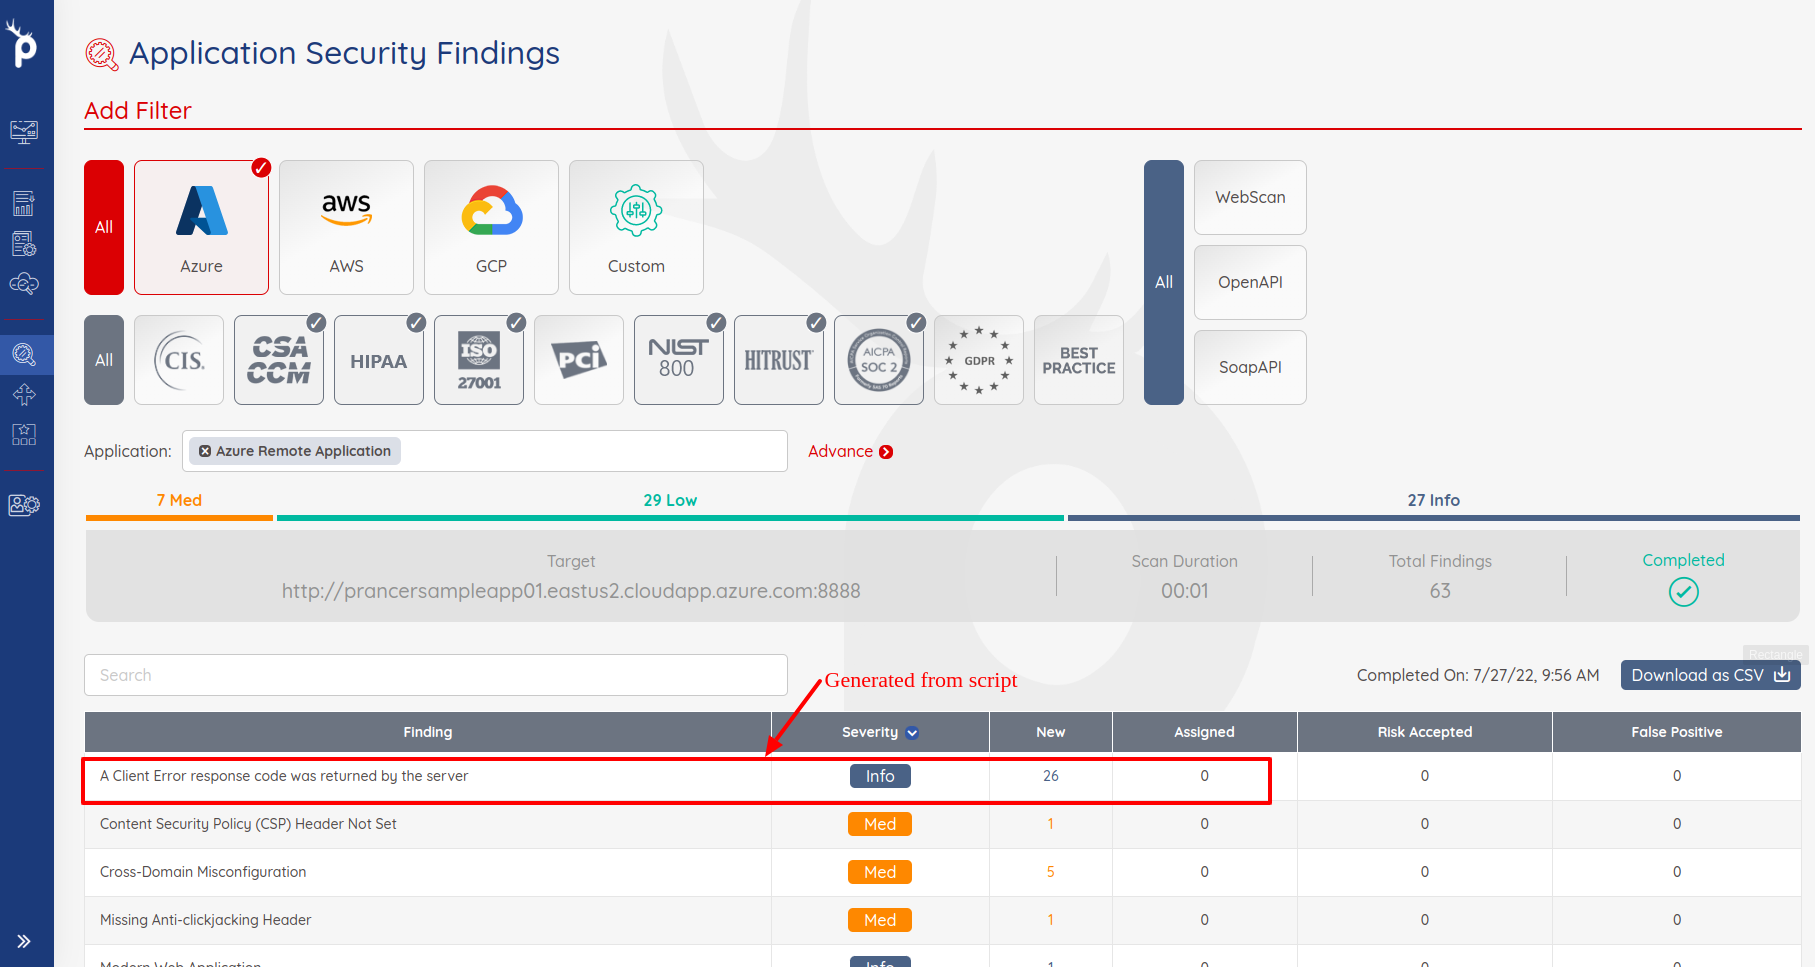
- This example script will check every response made during a penetration test and generate an alert for every response which satus code is equal to 400 or more, up to 599.
// A script which will raise alerts based on HTTP Response codes
// By default it will raise 'Info' level alerts for Client Errors (4xx) (apart from 404s) and 'Low' Level alerts for Server Errors (5xx)
// But it can be easily changed.

var control, model
if (!control) control = Java.type("org.parosproxy.paros.control.Control").getSingleton()
if (!model) model = Java.type("org.parosproxy.paros.model.Model").getSingleton()

var Pattern = Java.type("java.util.regex.Pattern")

pluginid = 100000   // https://github.com/zaproxy/zaproxy/blob/main/docs/scanners.md

function sendingRequest(msg, initiator, helper) {
    // Nothing to do
}

function logger() {
    print('[' + this['zap.script.name'] + '] ' + arguments[0]);
}

var control
if (!control) control = Java.type("org.parosproxy.paros.control.Control").getSingleton()

function responseReceived(msg, initiator, helper) {
    var code = msg.getResponseHeader().getStatusCode()
    var extensionAlert = control.getExtensionLoader().getExtension(org.zaproxy.zap.extension.alert.ExtensionAlert.NAME)
    if (extensionAlert != null) {
        var code = msg.getResponseHeader().getStatusCode()
        if (code < 400 || code >= 600) {
            // Do nothing
        } else {
            var risk = 0    // Info
            var title = "A Client Error response code was returned by the server"
            if (code >= 500) {
                // Server error
                risk = 1    // Low
                title = "A Server Error response code was returned by the server"
            }
            // CONFIDENCE_HIGH = 3 (we can be pretty sure we're right)
            var alert = new org.parosproxy.paros.core.scanner.Alert(pluginid, risk, 3, title)
            var ref = msg.getHistoryRef()
            if (ref != null && org.parosproxy.paros.model.HistoryReference.getTemporaryTypes().contains(
                        java.lang.Integer.valueOf(ref.getHistoryType()))) {
                // Dont use temporary types as they will get deleted
                ref = null
            }
            if (ref == null) {
                // map the initiator
                var type
                switch (initiator) {
                    case 1: // PROXY_INITIATOR
                        type = 1 // Proxied
                        break
                    case 2: // ACTIVE_SCANNER_INITIATOR
                        type = 3 // Scanner
                        break
                    case 3: // SPIDER_INITIATOR
                        type = 2 // Spider
                        break
                    case 4: // FUZZER_INITIATOR
                        type = 8 // Fuzzer
                        break
                    case 5: // AUTHENTICATION_INITIATOR
                        type = 15 // User
                        break
                    case 6: // MANUAL_REQUEST_INITIATOR
                        type = 15 // User
                        break
                    case 8: // BEAN_SHELL_INITIATOR
                        type = 15 // User
                        break
                    case 9: // ACCESS_CONTROL_SCANNER_INITIATOR
                        type = 13 // Access control
                        break
                    default:
                        type = 15 // User - fallback
                        break
                }
                ref = new org.parosproxy.paros.model.HistoryReference(model.getSession(), type, msg)
            }
            alert.setMessage(msg)
            alert.setUri(msg.getRequestHeader().getURI().toString())
            alert.setDescription("A response code of " + code + " was returned by the server.\n" +
                "This may indicate that the application is failing to handle unexpected input correctly.\n" +
                "Raised by the 'Alert on HTTP Response Code Error' script");
            // Use a regex to extract the evidence from the response header
            var regex = new RegExp("^HTTP.*" + code)
            alert.setEvidence(msg.getResponseHeader().toString().match(regex))
            alert.setCweId(388) // CWE CATEGORY: Error Handling
            alert.setWascId(20) // WASC  Improper Input Handling
            extensionAlert.alertFound(alert , ref)
        }
    }
}
Metadata File
metadata.yaml
- The metadata file contains the configuration details required for Prancer's PAC to run the attack. An example of the metdata.yaml file for the
http_senderscript is shown below.
Name: Alert On Http Response Code Errors
Type: httpsender
Engine: Oracle Nashorn
Description: A HTTP Sender Script which will raise alerts based on HTTP Response code
Charset: UTF-8
- Save both the
http_sender_attack.jsand themetadata.yamlfile in your specified Git repository. For example, we've saved the files inside of theAlert_on_HTTP_Response_Code_Errorsdirectory:
Git repository
.
|___ Alert_on_HTTP_Response_Code_Errors
│    │   http_sender_attack.js
│    │   metadata.yaml
run-hello.sh
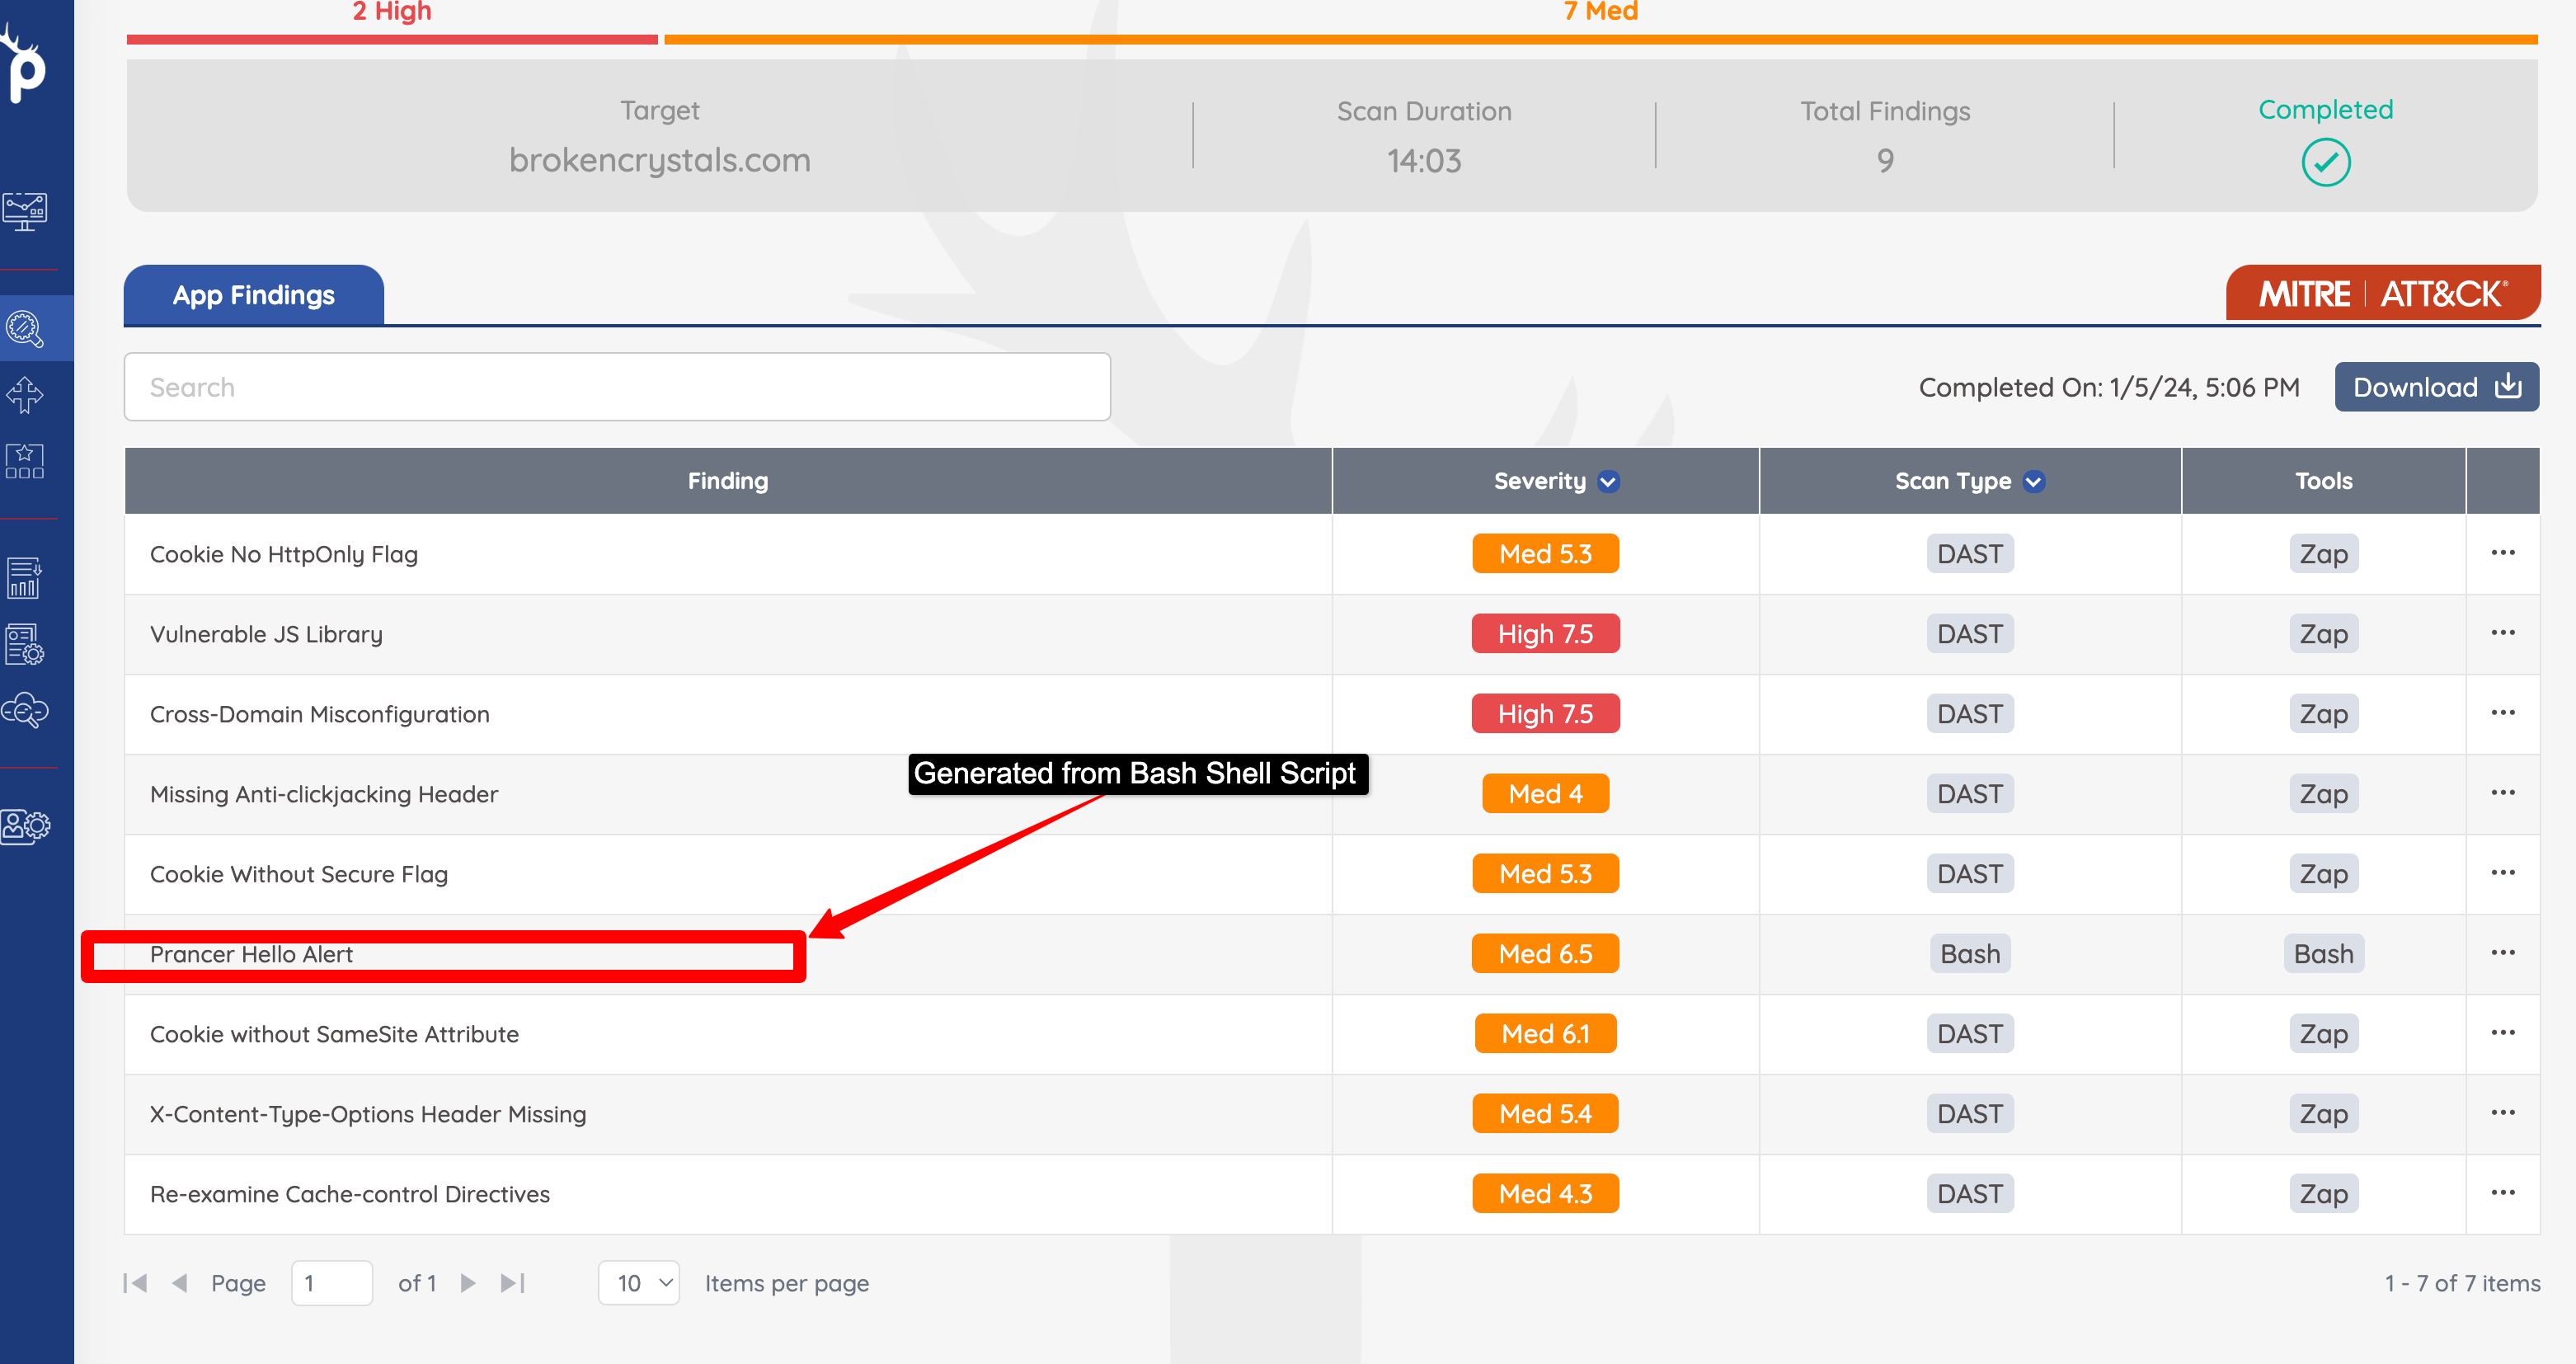
Here is a run-hello.sh Bash shell script which raises an alert. The condition can be added as per user requirements.
#!/bin/bash

# Source the prancer-lib shell script to call all pr-* library functions.
source shlib/prancer-lib.sh

# generate a hello alert, pass the target like: "https://brokencrystals.com/"
output=`pr_hello_world_alert "$1"`

# Check the output
if [ $? -ne 0 ];  then
  echo "Failed to generate alert!...."
else
  echo "$output"
fi

exit 0
For documentation on custom bash scripts refer to [../PAC/custom-bash-script.md]
metadata.yaml
Metadata file contains the configurations and details which are required for Prancer PAC to read.
Name: BashHello
Technology: standalone
Type: active
Engine: bash
Description: Run bash script to generate alert.
Charset: UTF-8
tags:
  Type: Blackbox, Web
Save both run-hello.sh and metadata.yaml files under BashHello at particular location in git. For example, we saved files inside the BashHello in root folder of the repository.
Git repository
.
|___ BashHello
│    │   run-hello.sh
│    │   metadata.yaml
Store the Secrets in Key Vault
Prancer requires the secure storage of an authentication token or key to connect and clone the Git repository. To generate a Git access token from the Git console, please refer to the official documentation.
First, ensure the following permissions are provided when generating the token:
repo: Full control of private repositories
read: user Read ALL user profile data
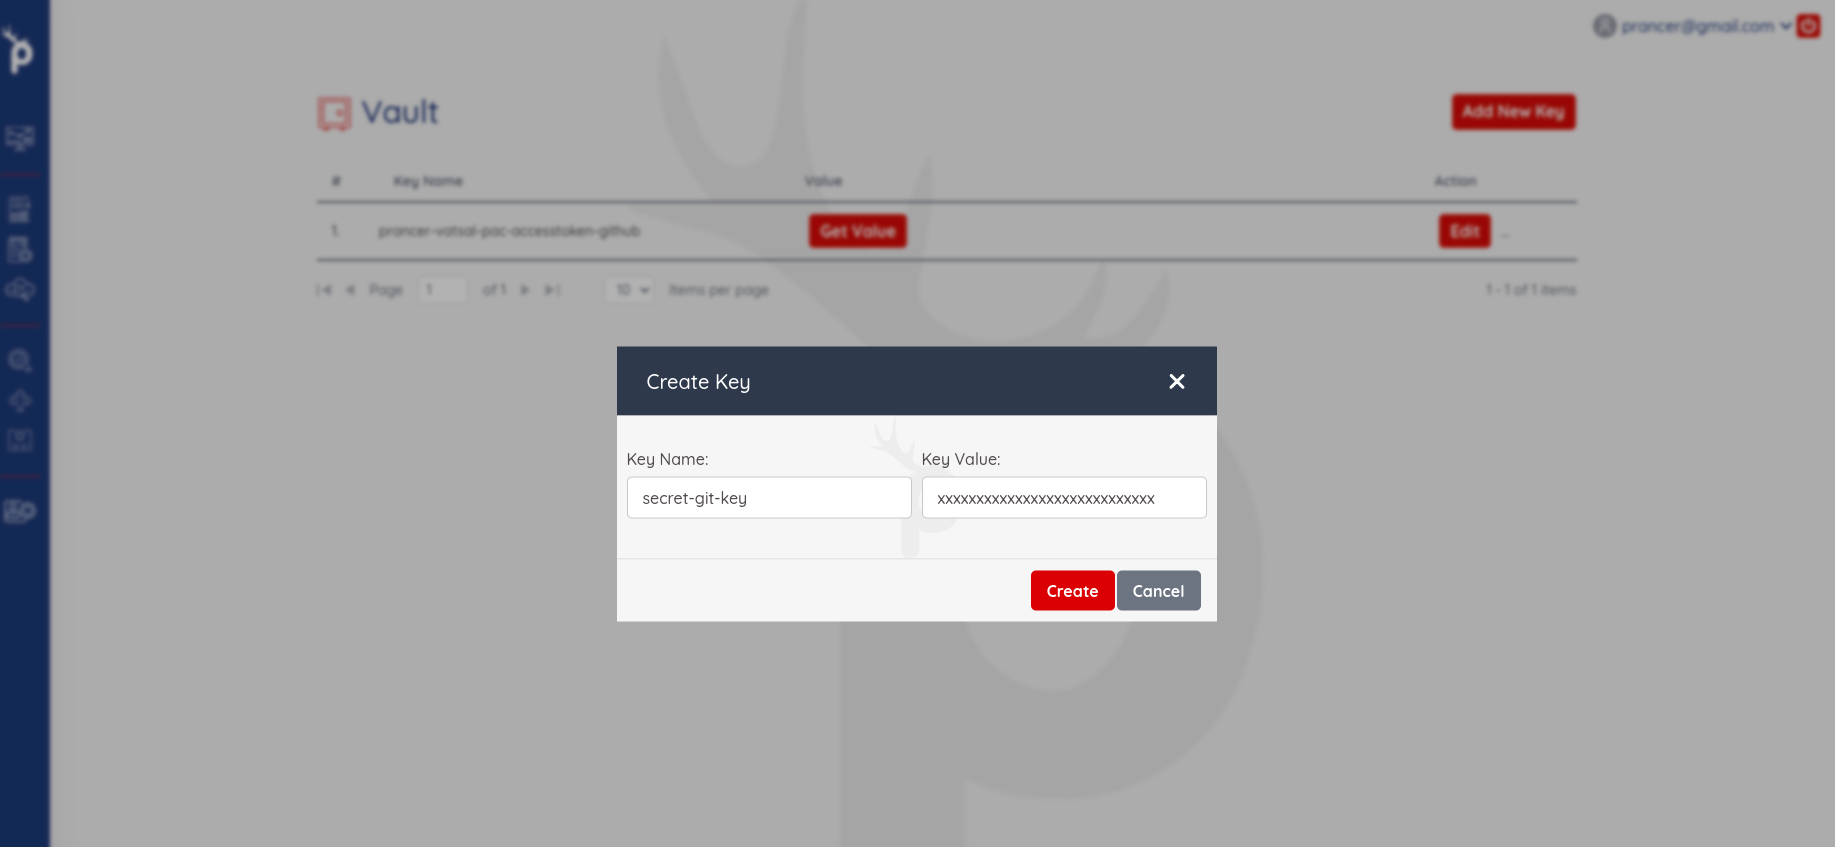
With this newly generated token, you can now create a new entry in the Key Vault. In our example, the Key Name is the value of httpAccessToken and Key Value is the generated access token.
Create and Upload a Git Connector File
A Git Connector file will be used to connect our Git repository to the Prancer platform. This connector will be in JSON format and the information provided in the file enables Prancer to run custom attacks from your repository. An example of the Git Connector file:
azure_custom_script_connector.json
{
    "branchName": "main",
    "companyName": "prancer",
    "fileType": "structure",
    "gitProvider": "https://github.com/prancer-io/prancer-pac-sample.git",
    "httpsAccessToken": "secret-git-key",
    "private": true,
    "type": "filesystem"
}
Breakdown of the fields in the JSON connector file:
| Field | Value | Description |
|---|---|---|
| container | container name | The container name should be match with the value of Collection property defined in PAC config file. |
| name | connector name | Any name of the connector which will use to define in PAC config file |
| gitProvider | clone URL | The URL for clone the git repository. |
| branchName | branch name | Git branch name where the zap scripts are available |
| httpsAccessToken | secret key | Any secret key which will be used to store the git token in the key vault |
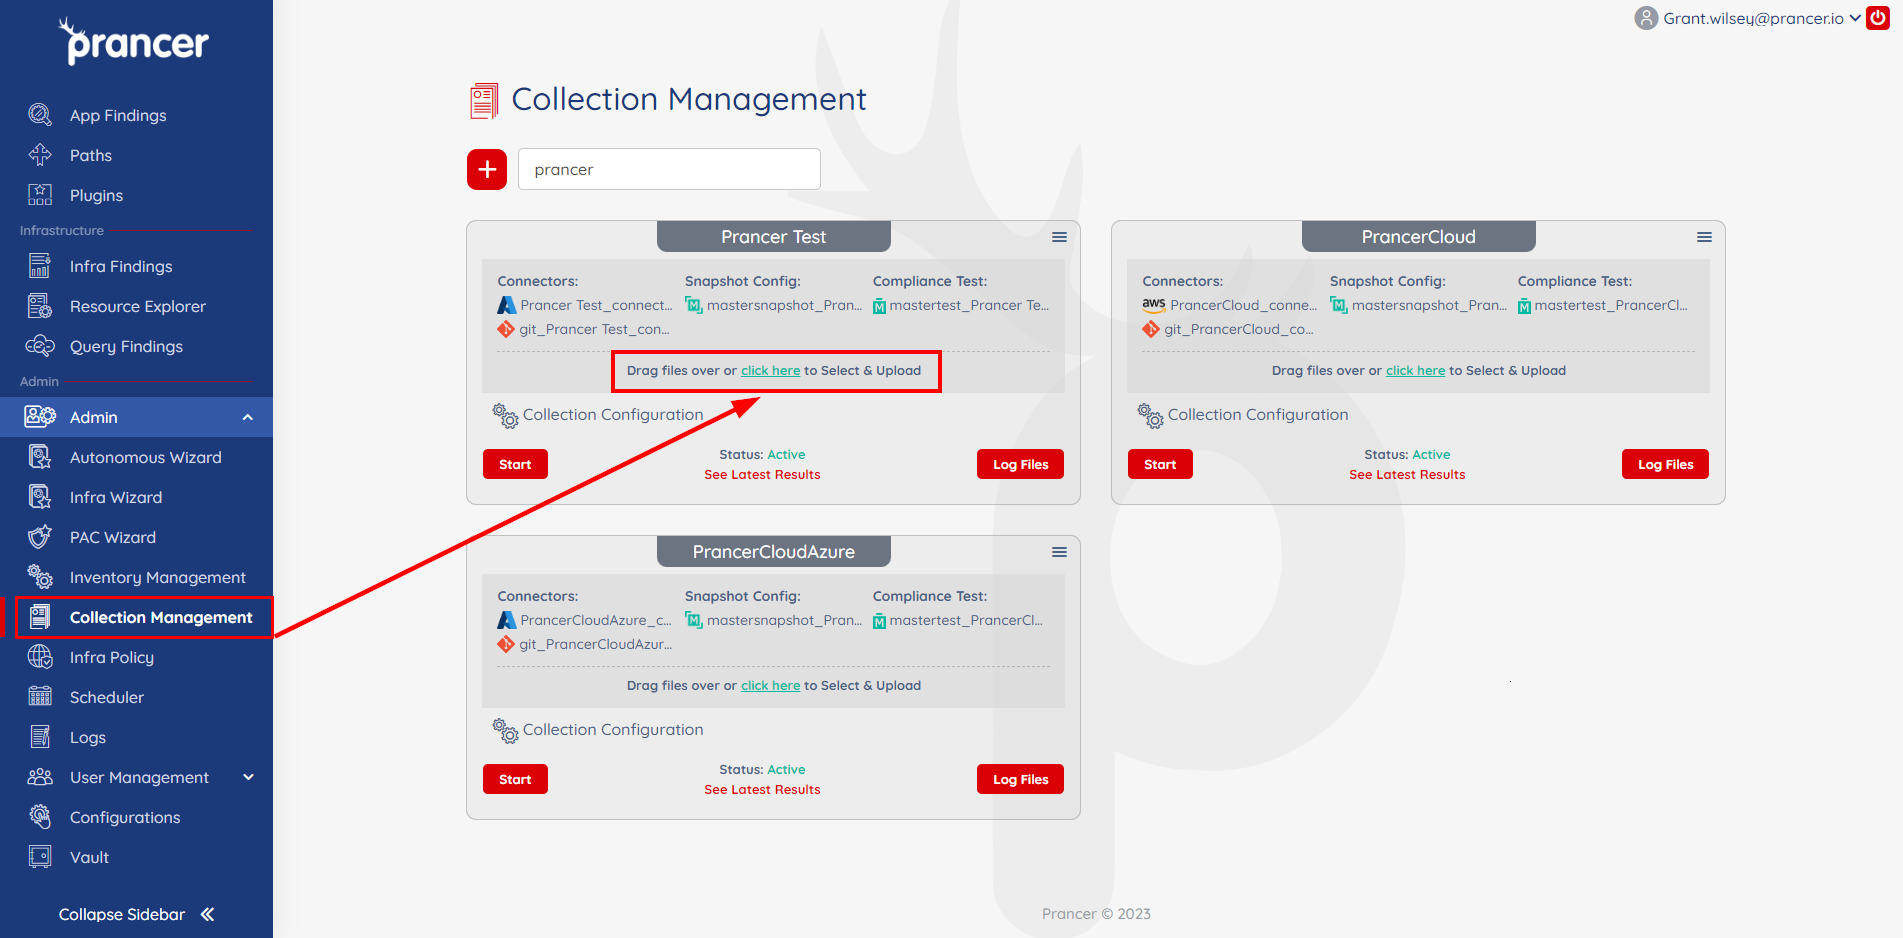
Once the Git Connector file has been created, upload the file by using the drag and drop feature or selecting the 'click here' option on the desired collection.
Create a PAC Application from the PAC Wizard
- Use the PAC Wizard to create a PAC configuration file.
- Existing PAC config files can also be edited to include the new custom attack. Exisitng PAC files can be found in Inventory Mangement or visible under the assigned collection.
Once created, you will be presented with the PAC config file editor and your file should look similiar to the example shown below:
Collection: azure_remote_test
ConnectionName: azure_remote_test_connector
CloudType: azure
ApplicatioName: Azure Remote Application
RiskLevel: safe
Compliance:
- CSA-CCM
- HIPAA
- ISO 27001
- SOC 2
- HITRUST
- NIST 800
ApplicationType: APIScan
Schedule: onetime
Target: http://prancersampleapp01.eastus2.cloudapp.azure.com:8888
# You can use postman collection as code for running attack inside the prancer.
# Connector defines the name of the git connector available in the collection.
# Postman remote files should include a path which has postman collection file and
# for postman env remote files, if you have environment variable file you can put
# the path inside the postmanEnvRemote file so prancer will go and extract the env
# variables and their values and merged it with postman collection.
APIScan:
  Type: OpenAPI
  DirectionProvider: git
  Direction: http://prancersampleapp01.eastus2.cloudapp.azure.com:8888/v2/swagger.json
  PostmanRemoteFile: remote_postman/postman_collection.json
  PostmanEnvRemoteFile: remote_postman/postman_environment.json
  Connector: azure_postman_connector
Scanner:
  Cloud:
    Platform:
      Azure:
        ContainerInstance:
          AfterRun: delete
          NewContainerInstance:
            External:
              SubscriptionId: 12345678-1234-5678-abcd-1234abcd4567
              ResourceGp: testgroup
              Region: eastus2
              ContainerGroupName: prancer-scanner-group
              ContainerName: prancer-pentest-instance
              ResourceName: prancer-instances-1
AuthenticationMethod: noAuthentication
AddOns:
- accessControl
- ascanrulesBeta
- sqliplugin
- directorylistv2_3
- portscan
- pscanrulesBeta
- websocket
- fuzzdb
- fuzzdboffensive
- fuzz
- graphql
- openapi
Update the PAC Config file:
- Once your PAC config file has been created, it's time to add your Custom Attack to the application.
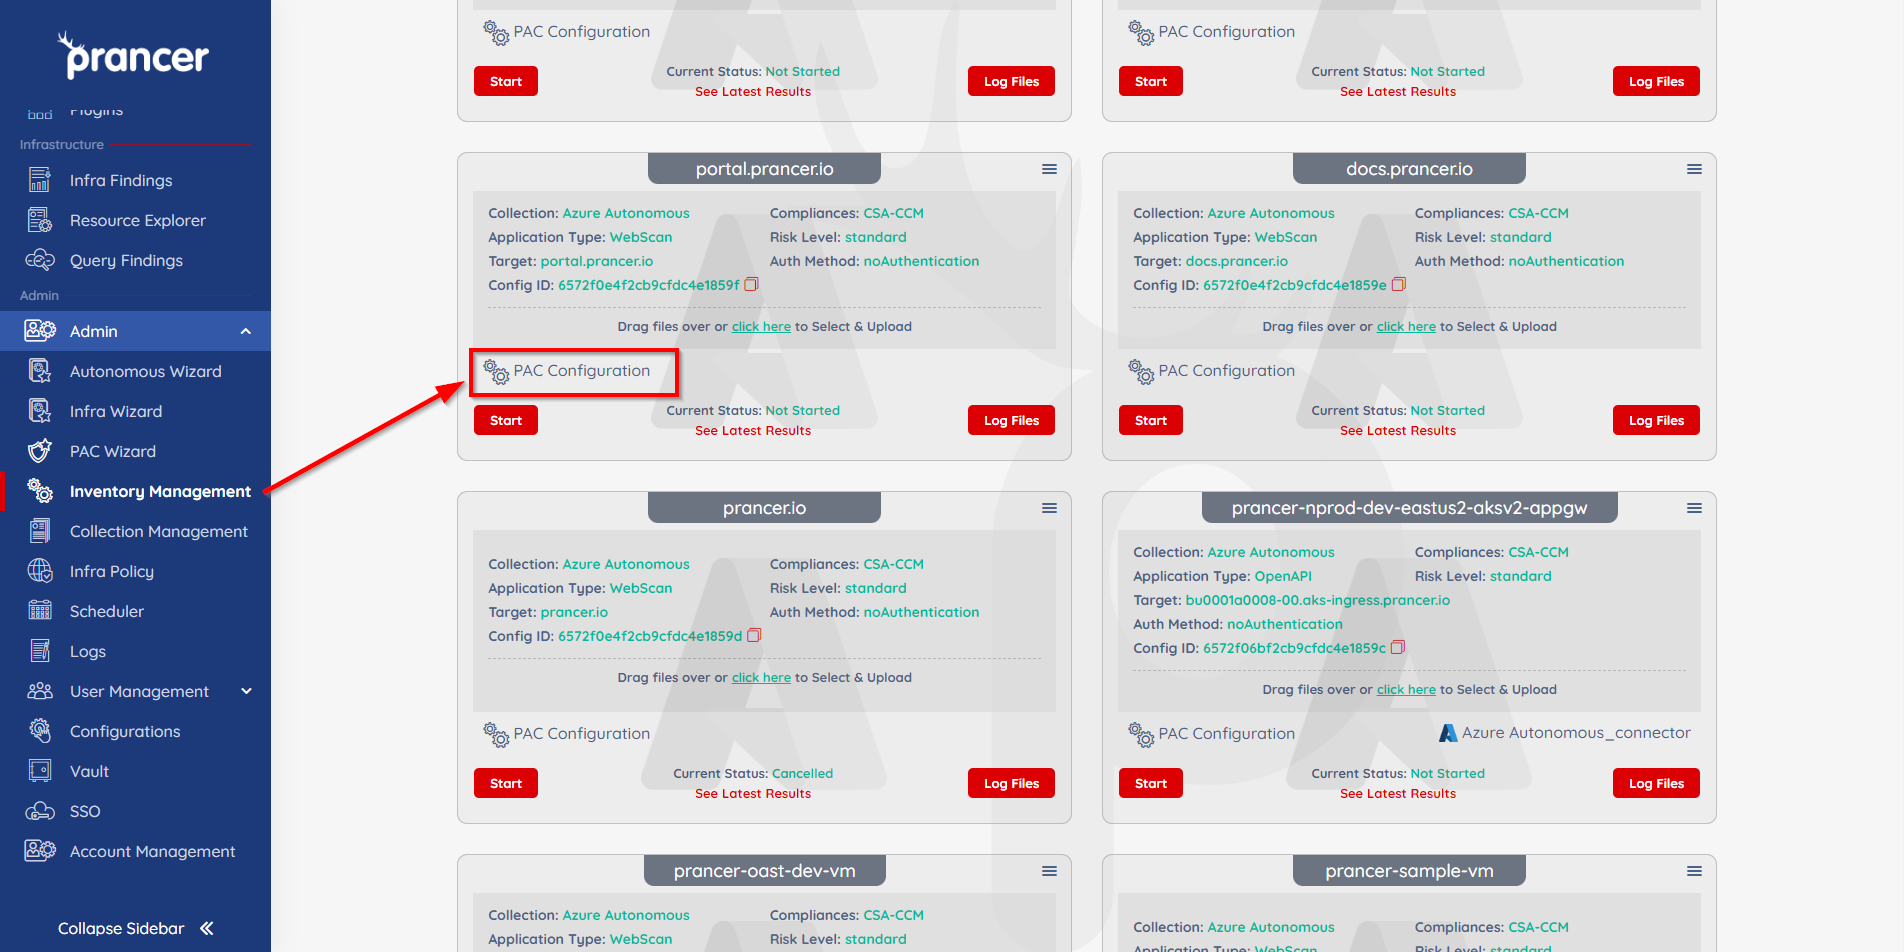
- Open the Inventory Management section of Prancer and click PAC Configuration on the application you'd like to add your attack to.
- Add the CVE field in the PAC configuration file.
Example template:
CVE:
- Path:
    Include:
    - .*\.js
    - abc.java
    - BashHello
    Exclude:
    - .*\.py
  Connector: azure_custom_script_connector
| Field | Value | Description |
|---|---|---|
| Connector | connector name | the container name which you specified in Git connector. |
| Path | Include and Exclude paths | Contains list of include and exclude paths |
| Path.Include | list of path | Contains list of script paths ( Regex ) which need to include in processing |
| Path.Exclude | list of path | Contains list of paths ( Regex ) which will be excluded while load the scripts. |
Complete PAC File
Collection: azure_remote_test
ConnectionName: azure_remote_test_connector
CloudType: azure
ApplicatioName: Azure Remote Application
RiskLevel: safe
Compliance:
- CSA-CCM
- HIPAA
- ISO 27001
- SOC 2
- HITRUST
- NIST 800
ApplicationType: APIScan
Schedule: onetime
Target: http://prancersampleapp01.eastus2.cloudapp.azure.com:8888
# You can use postman collection as code for running attack inside the prancer.
# Connector defines the name of the git connector available in the collection.
# Postman remote files should include a path which has postman collection file and
# for postman env remote files, if you have environment variable file you can put
# the path inside the postmanEnvRemote file so prancer will go and extract the env
# variables and their values and merged it with postman collection.
APIScan:
  Type: OpenAPI
  DirectionProvider: git
  Direction: http://prancersampleapp01.eastus2.cloudapp.azure.com:8888/v2/swagger.json
  PostmanRemoteFile: remote_postman/postman_collection.json
  PostmanEnvRemoteFile: remote_postman/postman_environment.json
  Connector: azure_postman_connector
CVE:
- Path:
    Include:
    - .*\.js
    - abc.java
    - BashHello
    Exclude:
    - .*\.py
  Connector: azure_custom_script_connector
Scanner:
  Cloud:
    Platform:
      Azure:
        ContainerInstance:
          AfterRun: delete
          NewContainerInstance:
            External:
              SubscriptionId: 12345678-1234-5678-abcd-1234abcd4567
              ResourceGp: testgroup
              Region: eastus2
              ContainerGroupName: prancer-scanner-group
              ContainerName: prancer-pentest-instance
              ResourceName: prancer-instances-1
AuthenticationMethod: noAuthentication
AddOns:
- accessControl
- ascanrulesBeta
- sqliplugin
- directorylistv2_3
- portscan
- pscanrulesBeta
- websocket
- fuzzdb
- fuzzdboffensive
- fuzz
- graphql
- openapi
Run the Pentest:
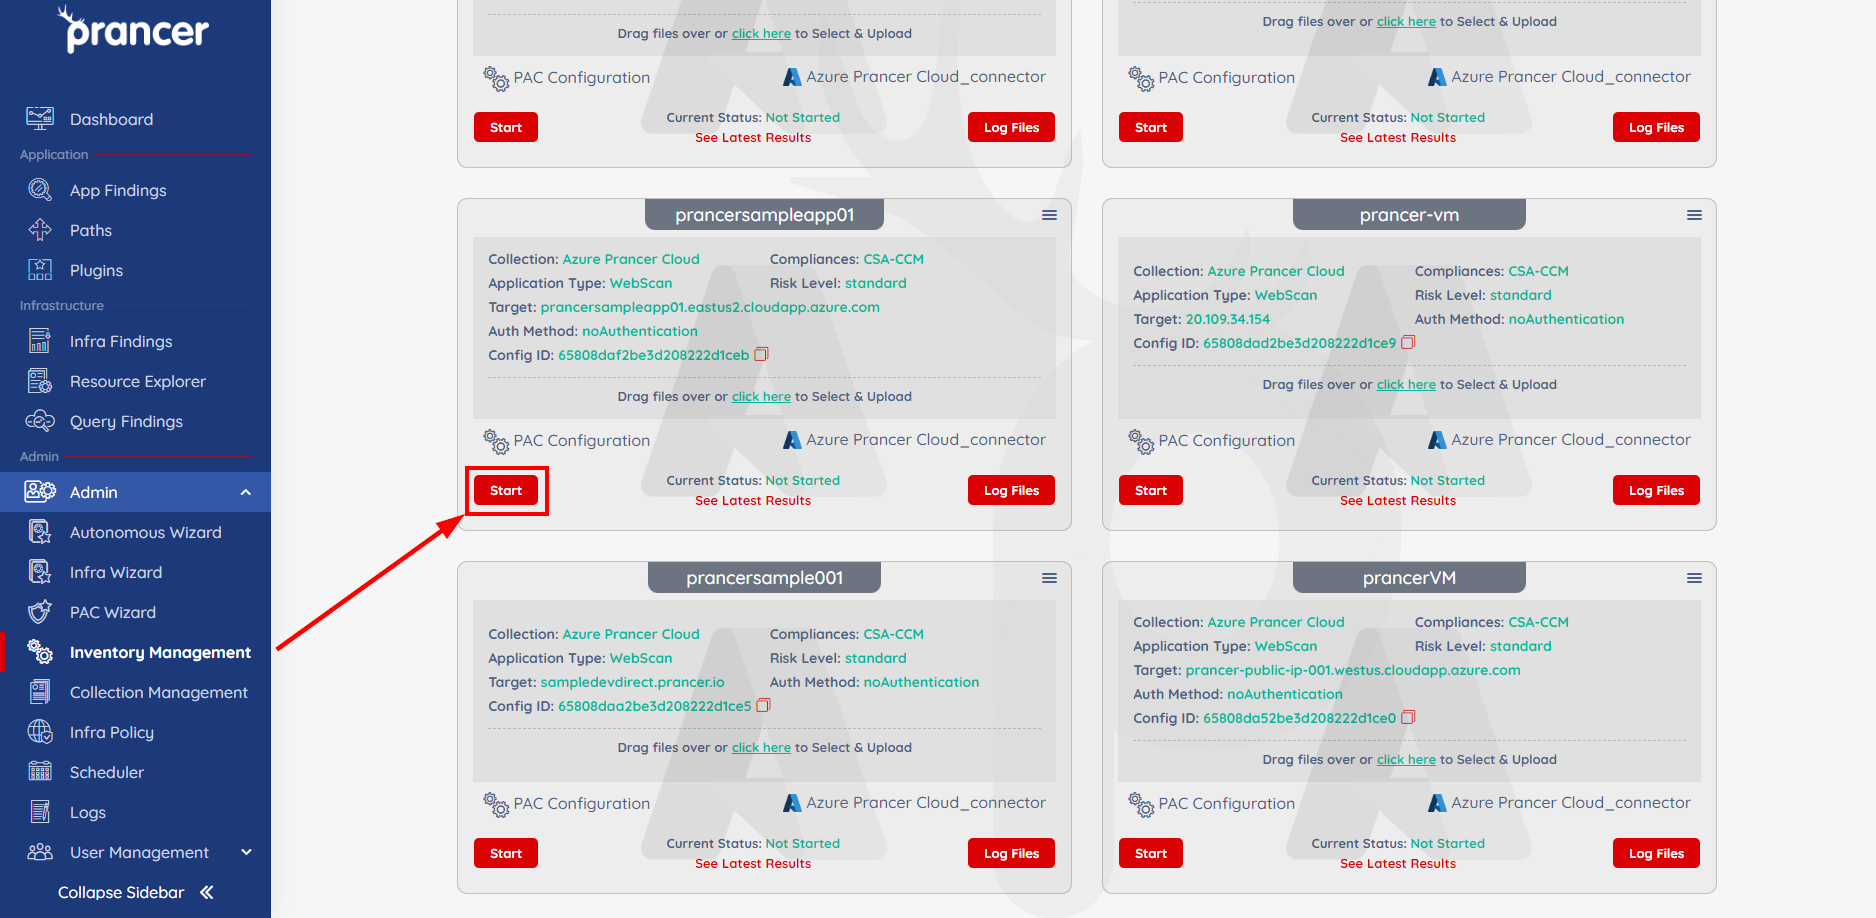
Now that everything is set up and the custom attack has been added to the PAC file, we can begin testing. Click the Start button on your PAC file to begin running the pentest.
- The amount of time needed to complete a test will vary depending on the size of your environment. The current status will be listed towards the bottom of the PAC file.
- You can check on the results of the test at any point by clicking on the
See Latest Resultsoption towards the bottom of the PAC file.

- Clicking this option will bring you to the
Application Security Findingspage. - Note, if multiple scans have been run using the same PAC file, the results will need to be filtered to narrow down the
Run the Pentest using CLI:
Check how to run the Pentest using CLI